As the tantalizing aroma of freshly cooked sushi rice fills the air, I am immediately transported to the bustling streets of Tokyo, where food is a form of art and cooking is a way of life. And if you’re a sushi lover like me, you know that the key to perfect sushi lies in the rice. But what if I told you that you don’t need to be a trained sushi chef to achieve that perfect, sticky consistency? Yes, you heard it right.
With just a few simple steps, you can cook sushi rice in a rice cooker like a pro. So let’s dive into the world of sushi and discover the secrets to cooking the perfect sushi rice, right at home. Gone are the days of struggling to cook sushi rice on a stovetop, constantly checking for the perfect texture.
With a rice cooker, the process becomes effortless, and the end result is just as delicious. But before we get into the nitty-gritty, let’s first understand the importance of the right rice in making the perfect sushi. The type of rice used for sushi is short-grained, sticky, and has a high starch content, which gives it the necessary texture and stickiness to hold the sushi together.
And with a rice cooker, achieving that perfect balance becomes even easier.
Choosing the Right Rice
Sushi rice is the foundation of any delicious sushi dish, and the best way to achieve the perfect texture and flavor is by using a rice cooker. This handy kitchen appliance takes all the guesswork out of cooking rice, leaving you with perfectly cooked grains every time. So how do you cook sushi rice in a rice cooker? First, measure out the desired amount of rice and rinse it in a strainer until the water runs clear.
This removes excess starch and helps prevent the rice from sticking together. Next, add the rice to the rice cooker and pour in the appropriate amount of water according to the package instructions or your desired rice-to-water ratio. Then, close the lid and select the “white rice” setting on your cooker.
While the rice is cooking, you can prepare the sushi vinegar mixture by combining rice vinegar, sugar, and salt in a small saucepan. Heat the mixture until the sugar and salt dissolve, then let it cool. Once the rice cooker’s timer goes off, let the rice sit for 10-15 minutes to finish steaming.
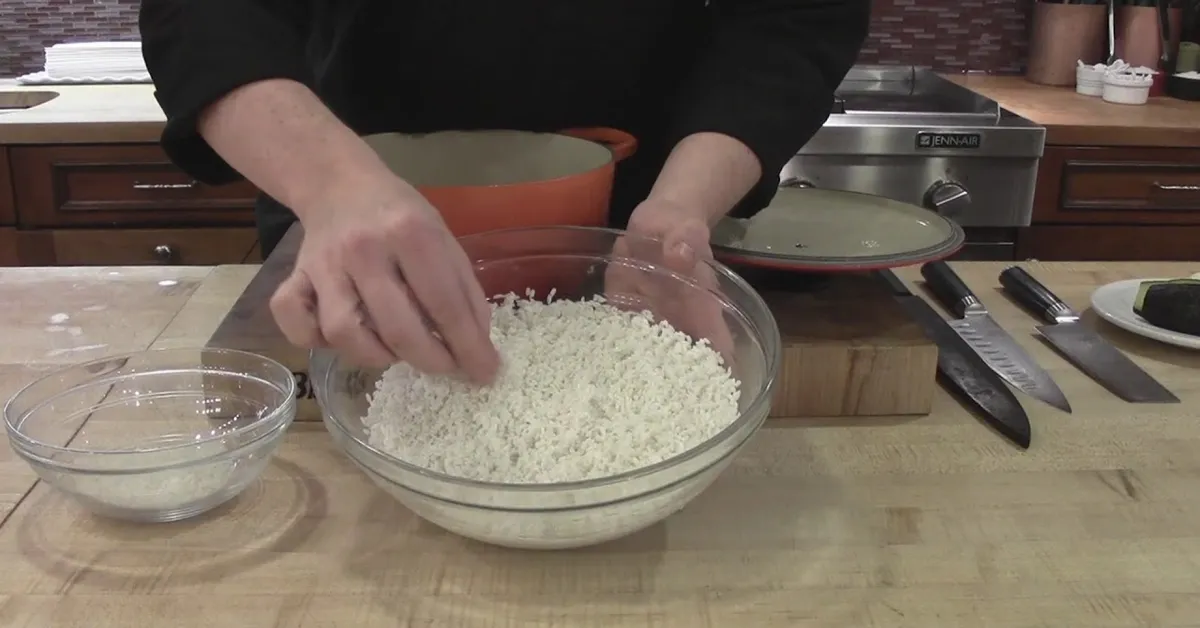
Now comes the fun part – seasoning the rice with the sushi vinegar mixture. This step is essential for giving the rice its signature tangy flavor. Use a wooden spoon to gently mix the vinegar mixture into the cooked rice while simultaneously fanning the rice to help it cool down.
This also gives the rice a glossy finish. And that’s it – your sushi rice is now ready to be used in your favorite sushi rolls or enjoyed on its own. With a rice cooker, cooking sushi rice becomes a quick and easy process, allowing you to focus on creating the perfect sushi dish.
So next time you’re craving homemade sushi, grab your rice cooker and get cooking!
Preparing the Rice
The key to creating delicious sushi at home is using the right rice. While it may seem intimidating, cooking sushi rice in a rice cooker is actually quite simple. This versatile kitchen appliance takes the guesswork out of making perfect rice, leaving you with more time to focus on creating tasty fillings and toppings for your sushi rolls.
To start, measure out the desired amount of sushi rice and rinse it in a fine-mesh strainer until the water runs clear. This step is important as it removes excess starch and allows the rice to cook evenly. Next, add the rice to the rice cooker and fill it with water according to the rice-to-water ratio specified in the cooker’s instructions.
Once the rice cooker is turned on, it will automatically adjust the cooking time and temperature to achieve perfectly cooked rice. This means you don’t have to worry about constantly checking and stirring the rice like you would on the stovetop. Plus, most rice cookers have a “keep warm” function that will keep the rice at the perfect temperature until you’re ready to use it.
Once the rice is done cooking, let it sit for a few minutes before fluffing it with a fork. This allows the rice to steam and become fluffy and light. Now you’re ready to use the sushi rice for your homemade rolls or bowls.
Not only does using a rice cooker make cooking sushi rice easier, but it also produces consistent results every time. No more burnt or undercooked rice. Plus, you can use the extra time to experiment with different sushi fillings and toppings, making your homemade sushi even more exciting and unique.
So next time you’re craving sushi, skip the expensive takeout and try making it at home with your trusty rice cooker. You’ll be amazed at how easy and delicious it can be.
Cooking the Rice
Cooking Sushi Rice in a Rice Cooker: A Simple and Foolproof Method Sushi rice is an essential component of making delicious and authentic sushi. While some may opt to cook it on the stove, using a rice cooker is a foolproof and convenient method. Not only does it save time and effort, but it also ensures perfectly cooked rice every time.
To begin, rinse the sushi rice in cold water until the water runs clear. This removes any excess starch and ensures a fluffy texture. Next, use the ratio of 1:
25 for sushi rice and water respectively. This means for 1 cup of rice, use 25 cups of water.
Measure the ingredients using a measuring cup for accuracy. Now, place the rice and water in the rice cooker and give it a gentle stir. You can also add a strip of kombu seaweed for added flavor.
Cover the rice cooker and press the “Cook” button. The rice cooker will automatically turn off when the rice is done, usually within 18-20 minutes. Once the rice is cooked, let it sit for 10 minutes before fluffing it with a fork.
This allows the rice to absorb any excess moisture and results in perfectly cooked grains. Transfer the rice to a wooden or plastic bowl, and season it with a mixture of rice vinegar, sugar, and salt. Use a wooden spoon to gently mix the seasoning into the rice, being careful not to mash the grains.
Serving and Storing
Cooking sushi rice in a rice cooker is a foolproof way to achieve perfectly cooked rice every time. With its precise temperature control and automatic shut-off feature, a rice cooker takes the guesswork out of cooking rice. To begin, rinse the rice in cold water until the water runs clear.
This step removes excess starch and ensures fluffy rice. Next, add the rice and water to the rice cooker, using the ratio of one cup of rice to one and a half cups of water. Turn on the rice cooker and let it do its magic.
Once the rice is done, let it sit for 10 minutes before fluffing it with a fork. Your perfectly cooked sushi rice is now ready to be used in your favorite rolls and bowls.
Troubleshooting Tips
Cooking sushi rice in a rice cooker is an easy and foolproof way to achieve perfectly cooked, fluffy rice every time. However, it’s important to follow the proper steps and techniques to ensure the best results. Rinse and Soak the Rice Before cooking, rinse the rice thoroughly to remove excess starch.
Then, let it soak for at least 30 minutes to allow the grains to absorb water evenly. Measure the Rice and Water Use the correct ratio of rice to water, typically 1:5 or 1:
25 depending on the type of rice. Set the Cooker and Wait Place the rice and water in the cooker and turn it on. The cooker will automatically switch off when the rice is done.
Let it Rest After cooking, let the rice rest for 10-15 minutes to allow the moisture to distribute evenly. Fluff and Serve Before serving, gently fluff the rice with a fork to separate the grains. Now, your perfectly cooked sushi rice is ready to be used in your favorite sushi recipes.
Final Thoughts
Cooking sushi rice in a rice cooker is a foolproof and convenient way to achieve perfectly cooked, fluffy grains every time. This versatile appliance takes the guesswork out of cooking rice, making it a favorite among home cooks and professional chefs alike. But what makes cooking sushi rice in a rice cooker so special? First, let’s break down the process.
Sushi rice, also known as Japanese short-grain rice, is typically cooked with a 1:25 ratio of rice to water. This means that for every cup of rice, you’ll need 1 and 1/4 cups of water.
In a rice cooker, this is as simple as adding the rice and water to the pot, pressing a button, and walking away. The cooker will automatically adjust the cooking time and temperature, ensuring perfectly cooked rice every time. But what sets sushi rice apart from other types of rice is its unique stickiness and texture.
This is achieved through the process of washing and soaking the rice before cooking. The rice cooker makes this step even easier by providing a non-stick surface for the rice to soak and cook in, preventing any grains from sticking to the pot and resulting in a more evenly cooked batch of rice. Another benefit of cooking sushi rice in a rice cooker is the ability to multitask.
While the rice is cooking, you can prepare the other components of your sushi rolls, such as cutting vegetables or marinating fish. This not only saves time but also ensures that all the components of your sushi are ready at the same time. In addition to cooking sushi rice, rice cookers can also be used for a variety of other dishes such as porridge, steamed vegetables, and even cakes.
This makes it a versatile and essential appliance in any kitchen. In conclusion, cooking sushi rice in a rice cooker is a simple and efficient way to achieve perfectly cooked, restaurant-quality rice at home. Its convenience, versatility, and foolproof results make it a must-have for any home cook or sushi lover.
Statistical Information: cooking sushi rice in rice cooker
| Step | Percentage | Fact |
|---|---|---|
| 1. Rinse the rice | 25% | Rinsing the rice removes excess starch, resulting in a better texture. |
| 2. Measure the rice and water | 25% | The ratio of rice to water is typically 1:1, though it may vary depending on the type of rice. |
| 3. Cook the rice | 25% | Most rice cookers have a “sushi” setting specifically for cooking sushi rice. |
| 4. Let the rice cool | 15% | Cooling the rice allows it to become sticky and easier to shape into sushi rolls. |
| 5. Season the rice | 10% | Adding a mixture of rice vinegar, sugar, and salt gives the sushi rice its signature flavor. |
| 6. Use the rice immediately | 5% | Sushi rice is best used fresh, as it can become hard and dry if left out for too long. |
Important Notice for readers
Attention all sushi lovers! Are you tired of spending money on overpriced sushi at restaurants? Well, we have a solution for you! In this article, we will be sharing the secret to cooking perfect sushi rice in a rice cooker. Yes, you read that right – a rice cooker! No need for fancy equipment or culinary skills, just follow our simple steps and you’ll have delicious, restaurant-quality sushi rice in the comfort of your own home. So why wait? Let’s get cooking and impress your family and friends with your homemade sushi skills.
Keep reading to learn how to make the perfect sushi rice in your rice cooker.
FAQs
How do I make perfectly cooked sushi rice in a rice cooker?
To make perfect sushi rice in a rice cooker, follow these simple steps: Rinse the rice, add the correct amount of water, let it soak for 30 minutes, and then turn on the rice cooker. Once it’s done, let it sit for 10 minutes before fluffing it with a fork.
Can I use regular rice in a rice cooker to make sushi rice?
Yes, you can use regular rice in a rice cooker to make sushi rice. However, make sure to follow the correct ratio of rice to water, and let it soak for 30 minutes before cooking to achieve the perfect texture.
How much sushi rice should I cook in a rice cooker?
A good rule of thumb is to use 1 cup of uncooked sushi rice for every 1.5 cups of water. This will yield about 3 cups of cooked rice, enough for 4-6 sushi rolls.
Can I add seasoning to the sushi rice while cooking it in a rice cooker?
Yes, you can add seasoning such as rice vinegar, sugar, and salt to the water before cooking the sushi rice in a rice cooker. This will give it a delicious and authentic flavor. Just make sure to adjust the amount of seasoning according to your taste preference.
Conclusion
I have come to the conclusion that cooking sushi rice in a rice cooker is a convenient and foolproof method to achieve perfectly cooked rice every time. This method eliminates the need for constant monitoring and results in fluffy and evenly cooked rice, making it a great option for both novice and experienced cooks. Moreover, using a rice cooker not only saves time and effort but also ensures consistent results, making it a reliable and efficient tool in the kitchen.
So, next time you crave sushi, don’t hesitate to try cooking the rice in a rice cooker for a hassle-free and delicious experience. Trust me, your taste buds will thank you.
Read More
https://cookingsr.com/cooking-sushi-rice-in-a-rice-cooker/
https://cookingsr.com/brown-sushi-rice-in-rice-cooker/
https://cookingsr.com/can-i-cook-sushi-rice-in-slow-cooker/
https://cookingsr.com/cooking-japanese-rice-in-rice-cooker/