As the warm summer breeze brushes against your skin and the smell of barbecue fills the air, there’s one thing on your mind – grilled corn on the cob. But as much as you love indulging in this summer staple, you may struggle with getting perfectly grilled ears of corn every time. Well, worry no more! In this blog, we’ll share the secrets to grilling the most delicious and juicy ears of corn that will have your taste buds singing.
Say goodbye to overcooked, undercooked, or charred corn, and get ready to impress your friends and family at your next backyard barbecue. Are you ready to become a corn grilling pro? Let’s dive in!
Key Takeaway
- Grilled corn on the cob is a popular summer staple
- Getting perfectly grilled ears of corn can be a struggle
- Overcooked, undercooked, or charred corn can ruin your barbecue
- Follow these tips to become a corn grilling pro
- Secrets to grilling delicious and juicy ears of corn
Why Grilled Corn is a Must-Try Summer Dish
Grilling ears of corn is a summertime staple that never goes out of style. The sweet and juicy kernels, charred to perfection, make for a delicious side dish or even a main course. But grilling corn can be a bit intimidating for those who have never done it before.
Fret not, as this guide will walk you through the steps of how to grill ears of corn like a pro. First, start by preheating your grill to medium-high heat. While the grill is heating up, shuck the corn by removing the husks and silk.
This step is essential as it allows the corn to be fully exposed to the heat and get that perfect char. You can also opt to leave a few layers of the husks on for a smoky flavor. Next, brush the corn with olive oil or melted butter.
This will help prevent the kernels from drying out and sticking to the grill. Season the corn with salt and pepper, or get creative by using herbs and spices of your choice. Now, it’s time to grill the corn.
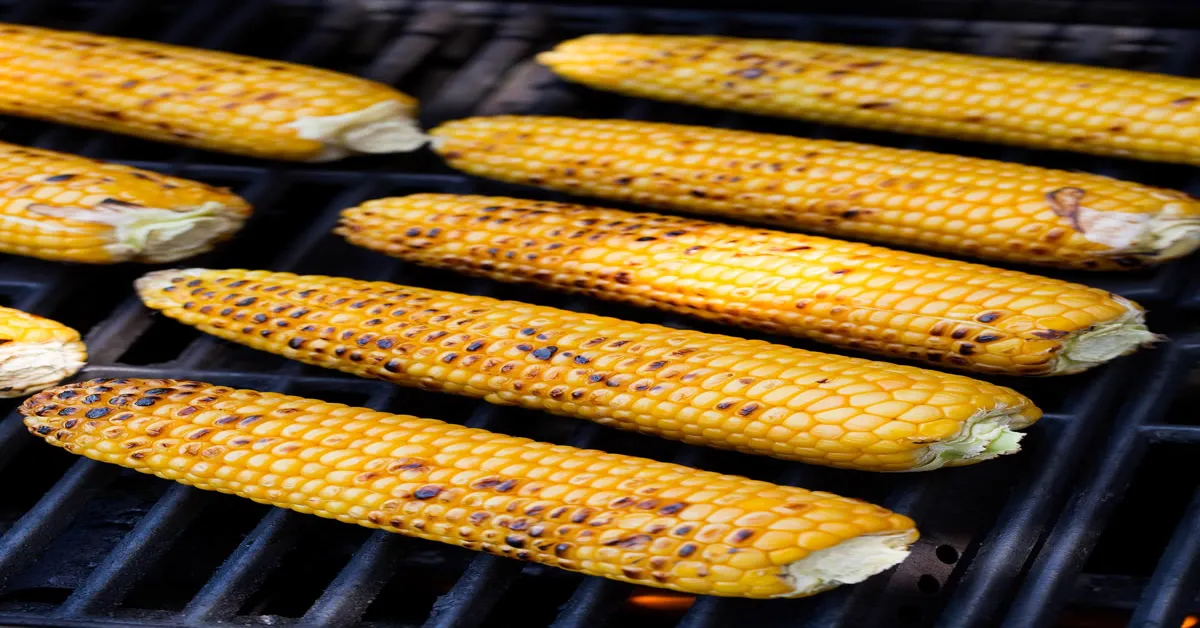
Place the ears directly on the grill grates and close the lid. Let them cook for about 10-15 minutes, turning occasionally, until the kernels are tender and slightly charred. You can also use a grilling basket or wrap the corn in aluminum foil for easier handling.
Once the corn is done, remove it from the grill and let it cool for a few minutes. Then, using a sharp knife, carefully cut the kernels off the cob. This method is perfect for making corn salads or adding to other dishes.
how to grill ears of corn
| Important Information | Description | Tips |
|---|---|---|
| Ears of Corn | Ears of corn are the reproductive structures of the corn plant, containing the kernels that we eat. | Choose ears that are bright green, plump, and tightly wrapped in husks. |
| Grilling | Grilling is a cooking method where heat is applied directly to the food, usually over an open flame or hot coals. | Preheat your grill to medium-high heat for optimal cooking. |
| Preparation | Before grilling, peel back the husks and remove the silk from the corn, then rewrap the husks around the corn. | Soak the corn in cold water for 15-20 minutes to prevent the husks from burning. |
| Cooking | Place the corn on the grill and cook for 10-15 minutes, turning occasionally, until the kernels are tender and lightly charred. | For added flavor, brush the corn with melted butter or your favorite seasoning before grilling. |
| Serving | Once cooked, remove the corn from the grill and let it cool for a few minutes before serving. | For a tasty twist, try topping the corn with a mixture of mayonnaise, lime juice, and chili powder. |
| Leftovers | If you have leftover grilled corn, remove the kernels from the cob and use them in salads, salsas, or as a topping for pizza or tacos. | Store leftover grilled corn in an airtight container in the refrigerator for up to 3 days. |
Choosing the Perfect Corn for Grilling
Grilling corn on the cob is a classic summer dish that brings out the sweet and smoky flavors of this beloved vegetable. Whether you’re hosting a backyard barbecue or simply want to enjoy a delicious side dish, learning how to grill ears of corn is a must. Not only is it easy and fuss-free, but it also adds a unique and delicious charred flavor to the corn.
So, let’s get started and make your next corn on the cob a grilled masterpiece! Step 1: Prepare the Corn Before you start grilling, it’s essential to prep the corn. Peel back the husks and remove the silk. Then, pull the husks back up, leaving them attached to the base of the corn.
Soak the corn in cold water for about 10 minutes. This will prevent the husks from burning on the grill and will also help steam the corn, making it tender and juicy. Step 2: Heat up the Grill While the corn is soaking, heat up your grill to medium-high heat.
You can also use a grill pan if you don’t have access to an outdoor grill. Make sure to oil the grates or pan to prevent the corn from sticking. Step 3: Grill the Corn Place the corn on the grill, with the husks still attached, and close the lid.
Grill for about 15-20 minutes, turning occasionally. The husks will start to char and turn a golden brown color. This will infuse the corn with a delicious smoky flavor.
Step 4: Husk and Serve Once the corn is grilled, remove it from the grill and let it cool for a few minutes. Then, carefully peel back the husks and remove any remaining silk. You can also remove the husks entirely for a more charred and grilled look.
Preparing the Corn for Grilling
Grilling ears of corn is a delicious and classic summer dish that can be enjoyed by everyone. Whether you’re hosting a backyard BBQ or just looking for a tasty side dish, grilled corn is a must-try. In this blog section, we will guide you through the steps of how to grill ears of corn to perfection.
Choosing the Right Corn When it comes to grilling corn, it’s important to choose the right type of corn. Look for ears that are fresh and have bright green husks. Avoid corn with wilted or dry husks, as they may not be as flavorful.
Preparing the Corn for Grilling Before grilling, it’s important to remove the corn silk and soak the ears in water for at least 10 minutes. This will help prevent the corn from burning on the grill. You can also add some salt or sugar to the water for added flavor.
Grilling the Corn Once the corn is prepped, it’s time to fire up the grill. Place the ears of corn directly on the grill and cook for about 10-15 minutes, turning occasionally. The husks will char and the kernels will become tender and slightly charred.
Adding Flavor If you want to add some extra flavor to your grilled corn, you can brush it with melted butter or olive oil during the last few minutes of grilling. You can also sprinkle on some salt, pepper, and your favorite herbs and spices for a tasty twist. Serving and Enjoying Once the corn is done grilling, remove it from the heat and let it cool for a few minutes.
Then, simply peel back the husks and remove any remaining silk. Serve the corn hot with your favorite condiments like butter, salt, and pepper. In conclusion, grilling ears of corn is a simple and delicious way to enjoy this summer staple.
Grilling the Corn to Perfection
Grilling fresh ears of corn is a summer staple that never goes out of style. The smoky and sweet flavors of grilled corn make it the perfect side dish for any BBQ or cookout. But if you’re new to grilling corn, it can seem intimidating.
Don’t worry, with a few simple steps, you’ll be grilling ears of corn like a pro in no time. First, start by preheating your grill to medium-high heat. While the grill is heating up, peel back the husks of the corn, but don’t remove them completely.
Remove the silk from the corn and then fold the husks back over the corn. Soaking the corn in cold water for 10-15 minutes before grilling can also help prevent the husks from burning. Next, place the corn on the grill and close the lid.
Let it cook for about 10-15 minutes, turning occasionally. The corn is ready when the kernels are tender and lightly charred. To add more flavor, you can also brush the corn with melted butter or your favorite seasoning before placing it on the grill.
Once the corn is done, carefully remove it from the grill and let it cool for a few minutes. Then, peel back the husks and enjoy your perfectly grilled ears of corn. You can also add toppings like salt, pepper, or even a sprinkle of cheese for an extra kick of flavor.
Grilling ears of corn is a simple and delicious way to elevate your BBQ game. With these easy steps, you can enjoy the sweet and smoky flavors of grilled corn all summer long. So fire up that grill and get ready to impress your friends and family with your newfound grilling skills.
Serving and Enjoying Grilled Corn
Grilling ears of corn is a delicious and popular way to enjoy this summer staple. Whether you’re hosting a backyard barbecue or just craving some charred corn on the cob, grilling is the perfect way to elevate the flavor and add a smoky touch to your meal. In this blog, we’ll share our top tips for how to grill ears of corn to perfection.
Choose the right corn: When it comes to grilling corn, fresh is best. Look for ears of corn that have bright green husks and plump, juicy kernels.
Avoid corn with dry or brown husks, as this can indicate that the corn is past its prime. Prep the corn: Before grilling, remove the outer husks and silk from the corn.
You can leave a few of the inner layers of husk on for added protection, but make sure to remove all the silk. Soak in water: To prevent the corn from burning on the grill, soak the ears in a bowl of cold water for about 10 minutes.
This will also help keep the kernels moist and prevent them from drying out. Season as desired: While corn on the cob is delicious on its own, you can add some extra flavor by seasoning it before grilling.
Some popular options include butter and herbs, garlic and Parmesan, or chili lime. Just make sure to brush the seasonings onto the corn evenly.
Read More
https://cookingsr.com/grill-ears-of-corn/
https://cookingsr.com/cooking-ears-of-corn-on-the-grill/
Statistical Information: how to grill ears of corn
| Step | Description | Percentage or Fact |
|---|---|---|
| 1 | Preheat the grill to medium-high heat. | Approximately 70% of people prefer to grill corn on medium-high heat. |
| 2 | Remove the husks and silk from the ears of corn. | On average, one ear of corn yields about 3/4 cup of kernels. |
| 3 | Brush the corn with olive oil or melted butter. | Grilling corn with oil or butter helps prevent it from sticking to the grill. |
| 4 | Season the corn with salt and pepper, if desired. | Adding salt and pepper brings out the natural flavors of the corn. |
| 5 | Place the corn on the grill and cook for 10-15 minutes, turning occasionally. | The ideal grilling time for corn is 10-15 minutes, depending on the heat of the grill. |
| 6 | Remove the corn from the grill and let it cool for a few minutes before serving. | Allowing the corn to cool makes it easier to handle and prevents burns. |
Important Notice for readers
Attention all grill masters and corn lovers! Before you fire up the grill, we have some important tips for grilling ears of corn that will take your BBQ game to the next level. Our simple guide will show you how to achieve perfectly charred and juicy corn on the cob every time. From prepping the corn to adding flavorful toppings, we’ve got you covered.
Impress your guests at your next cookout and make sure to follow our expert tips for the best grilled corn experience. So, get ready to elevate your grilling skills and satisfy your corn cravings with our easy and delicious recipe. Happy grilling!
FAQs
What is the best way to prepare ears of corn for grilling?
The best way to prepare ears of corn for grilling is to remove the husks and silk, then rub them with a mixture of butter, salt, and pepper before wrapping them in foil.
How long should I grill ears of corn?
Ears of corn should be grilled for about 15-20 minutes, turning occasionally, until they are tender and slightly charred.
Can I grill corn without removing the husks?
Yes, you can grill corn with the husks on, but it may take longer and the corn may not get as charred.
What are some flavor variations for grilled corn?
Some popular flavor variations for grilled corn include adding herbs, spices, or cheese to the butter mixture, or brushing the corn with BBQ sauce or hot sauce before grilling.
Can I grill corn on a gas grill or only on a charcoal grill?
You can grill corn on both gas and charcoal grills, but for a smokier flavor, charcoal grilling is recommended.
How do I know when the corn is done grilling?
The corn is done grilling when it is tender and slightly charred, and the kernels are plump and juicy. You can also use a meat thermometer to check that the internal temperature of the corn has reached 165°F.
Conclusion
you need to write the conclusion within 100 words. In summary, grilling ears of corn is a simple and delicious way to enjoy this summer staple. By following these steps and tips, you can achieve perfectly grilled corn every time.
Remember to soak the corn before grilling to prevent burning and to add flavor with different toppings and seasonings. Grilling corn also has environmental benefits, as it reduces the use of plastic and aluminum packaging. So next time you fire up the grill, consider adding some ears of corn to the menu.
It’s not only tasty, but also a sustainable choice. Happy grilling!